Demystifying the Vue Lifecycle
12 March 2020
Each Vue component has a lifecycle that it goes through as it initializes and that cycle concludes when the component is destroyed (or unmounted). The full lifecycle diagram from the Vue documentation can be viewed here. I’ll talk in more detail below about what is happening in each section as I breakdown the lifecycle hooks and their various use cases.
A caveat that I will note is that this currently applies to Vue 2.x and does not contain any changes that may happen in Vue 3. Most, if not all, of the information here should still apply, but when Vue 3 launches, I will make sure to update this post.
beforeCreate and created
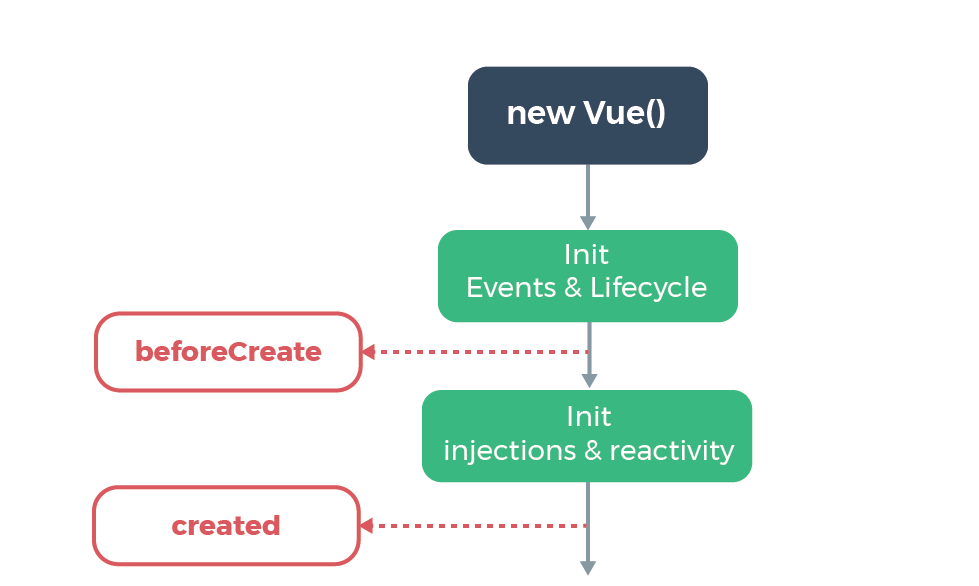
At this point in the lifecycle, the instance is just initializing. beforeCreate runs, and then reactivity is set up on the data, and then the created hook runs. Both of these hooks do run during server-side rendering.
An important note here is that if you are using the Composition API, setup is run after beforeCreate and before created. You can likely accomplish all that you need from these hooks within setup.
beforeCreate
export default {
  data() {
    return {
      foo: 'bar'
    }
  },
  beforeCreate() {
    console.log(this);
    // This will work and will return the component instance
    console.log(this.foo);
    // This will return undefined as data has not yet been initialized
  }
}
We can see in this example that we do have access to the instance itself, but that instance will not have any data or methods accessible on it yet. In the example above if we decided to try and access this.foo we would get back undefined as the data has not been initialized on the instance yet. This hook does run during server-side rendering though, so it can be useful there.
created
export default {
  data() {
    return {
      cupcakes: []
    }
  },
  created() {
    axios({ /* Call and get the cupcakes! */ })
      .then(res => {
        this.cupcakes = res.data;
      })
  }
}
This hook runs once the instance is created and fully functional. The DOM has not yet re-rendered though as that takes place later during the mounted stage. This is an ideal time to make any network calls to populate data that the component needs or do any initial data manipulation/setup that is required. By making network calls in this hook rather than mounted, the call is able to fire off sooner and the user will have less perceived load time.
beforeMount and mounted
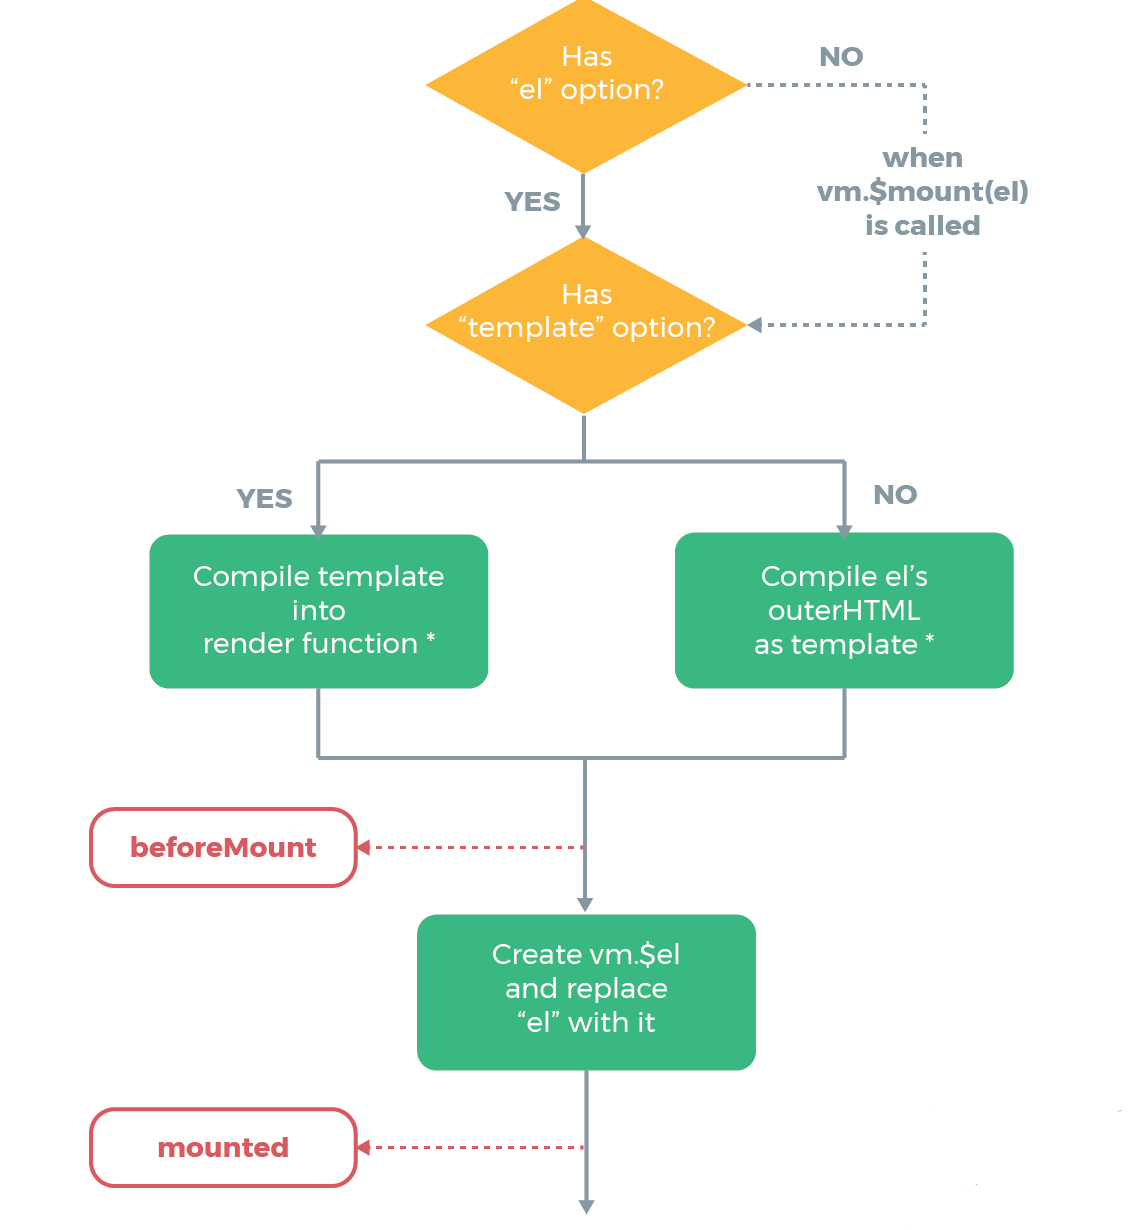
Picking up where we left off in the previous image, after the created hook fires, the template is compiled into a render function to prepare the virtual DOM. At that point, beforeMount will run. Then the DOM will actually re-render with your template, and once the DOM has re-rendered, mounted will run.
beforeMount
<div id="app" data-dessert="cake"></div>
new Vue({
  el: '#app',
  data() {
    return {
      serving: 'spaghetti'
    }
  },
  template: '<div>{{ serving }}</div>',
  beforeMount() {
    console.log(this.$el); // <div id="app" data-dessert="cake"></div>
    console.log(this.$el.dataset.dessert); // cake
    this.serving = this.$el.dataset.dessert;
  },
  mounted() {
    console.log(this.$el); // <div>cake</div>
    console.log(this.$el.dataset.dessert); // undefined
  }
});
beforeMount is not a hook that is commonly used. In most cases, you’d find yourself better off using either created or mounted depending on your needs. There is, however, a very specific thing that beforeMount allows us to do because it runs when we can access this.$el but before that has been replaced during the re-render process.
At times embeddable applications need to take in configuration options. There are multiple ways to accomplish this (I have personally used and like vue-custom-element), but we can actually do this by taking advantage of the beforeMount hook. In the above example, we can see an application that displays what is currently being served. The default is spaghetti. However, on our el we can see that we’ve provided another option on data-dessert. In our example, we are able to strip this value off of the this.$el.dataset.dessert during beforeMount and overwrite this.serving.
This works because at the time of beforeMount, we have access to this.$el although it has not been replaced yet with the result of the render function. Once we hit mounted, the DOM has re-rendered and we no longer have access to the item on the dataset because it has been overwritten with the template, but it doesn’t matter because we’ve already gathered the configuration items we needed during the beforeMount hook!
mounted
<div class="my-chart"></div>
export default {
  data() {
    return {
      chartData: { ... },
      chartOptions: { ... }
    }
  },
  mounted() {
    new Chartist.Bar(`.my-chart`, chartData, chartOptions);
  }
}
At the point that mounted has run, the DOM has fully re-rendered. This is an ideal time to wire up any outside libraries that need to reference the DOM. In the example above, we are using the Chartist.js library to initialize a chart. We’ve populated our chartData and our chartOptions and once the DOM is re-rendered we can safely set up that library.
Note that mounted should really be reserved for actions like this, with any data manipulation or network calls taking place in created as referenced above. Not only does this get network calls off sooner, but it can also help prevent issues with child components. For example, if you have a child component that has computed properties based on props that are set up during the parent’s mounted, you may get temporary errors as the child component hits its initialization while the parent’s mounted hook is still processing.
beforeUpdate and updated
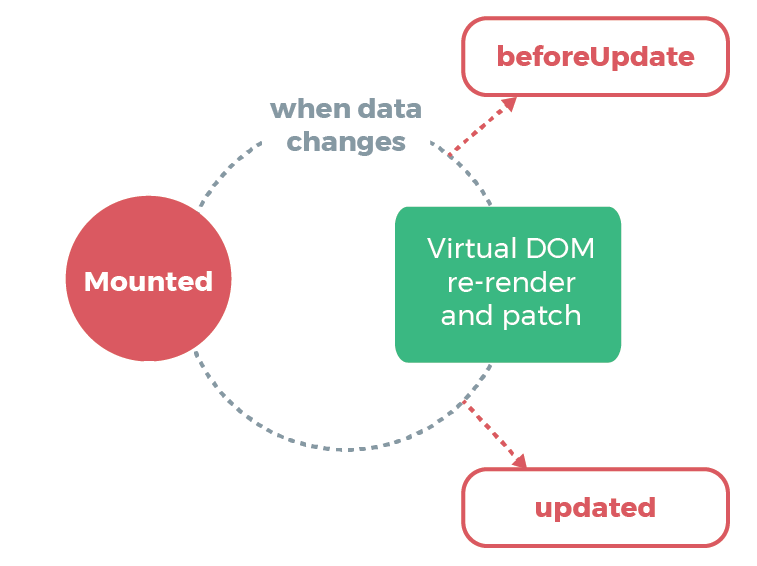
Once the component has mounted, it begins a cycle where it watches for data changes which triggers the update cycle. When data changes beforeUpdate will fire, then the DOM will re-render, and then the updated hook is fired. While you can use these hooks to respond to data changes, it is best to watch for specific data changes using watch or computed. These hooks are best reserved for things such as analytics, but it is still important to understand and visualize when in the cycle they are firing.
beforeUpdate
<div ref="counter">{{ count }}</div>
<button @click="increaseCount">Click me!</button>
export default {
  data() {
    return {
      count: 0
    }
  },
  beforeUpdate() {
    console.log(this.count); // 1
    console.log(this.$refs.counter.textContent) // 0
  },
  methods: {
    increaseCount() {
      this.count++;
    }
  }
}
beforeUpdate runs after data has changed, but before the DOM has re-rendered to reflect that change. In this example, we have a simple component that displays a count and has a button that you can click to run the increaseCount method. Clicking that button will cause this.count to change, which will then trigger the beforeUpdate hook. In the beforeUpdate hook in the above example, we can see that it runs when this.count has changed, but the counter in the DOM has not yet updated.
updated
<div ref="counter">{{ count }}</div>
<button @click="increaseCount">Click me!</button>
export default {
  data() {
    return {
      count: 0
    }
  },
  updated() {
    console.log(this.count); // 1
    console.log(this.$refs.counter.textContent) // 1
  },
  methods: {
    increaseCount() {
      this.count++;
    }
  }
}
updated runs following the DOM re-render after data changes. Looking at the same example that was used for beforeUpdate, we can see that the updated hook is triggered when both this.count has increased and the DOM has been updated to match.
beforeDestroy and destroyed
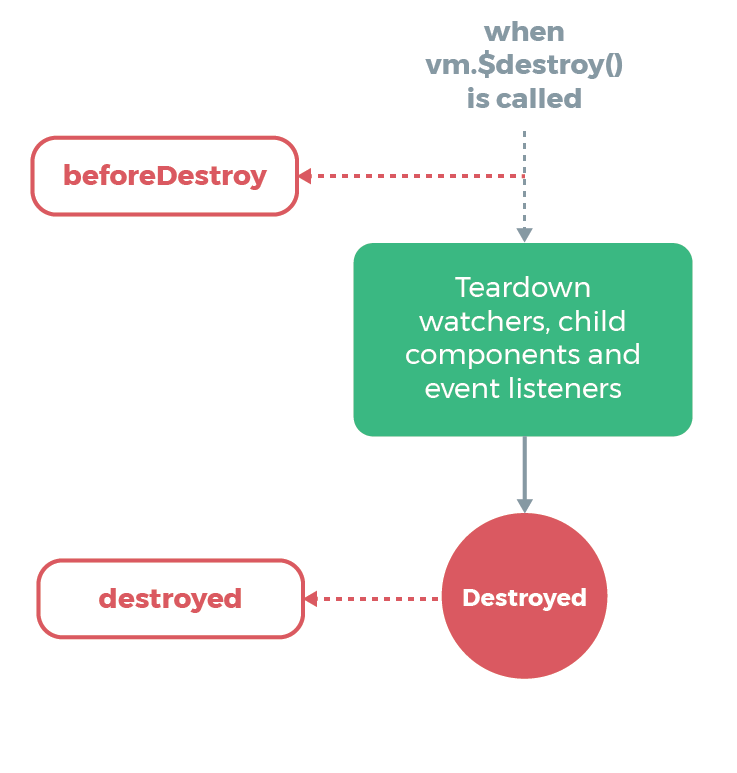
Once a component is set to destroy, whether that is from being removed in a v-for, a v-if condition no longer being met, or other means, the component goes through a teardown cycle. beforeDestroy will run before that teardown actually begins. destroyed will run once that teardown has been completed.
beforeDestroy
export default {
  beforeDestroy() {
    this.$emit('setParentMessage', 'The child has been destroyed');
    // must be set here when the instance is fully functional
  }
}
At the point where beforeDestroy runs, the component instance is still fully functional. This means that you can still access data items and events. In the above example, we emit out to the parent to notify that the child is being destroyed. Other use cases could be things like resetting leaky variables.
destroyed
export default {
  mounted() {
    document.addEventListener('keydown', this.handleEscape);
  },
  destroyed() {
    document.removeEventListener('keydown', this.handleEscape);
  },
  methods: {
    handleEscape(e) {
      if (e.key === 'Escape') {
        this.$emit('closeModal');
      }
    }
  }
}
destroyed fires after child components have been destroyed and event listeners have been removed. The instance can no longer communicate with its parent, but as this is the last stage in the lifecycle, this is an ideal time to perform any final clean up, such as removing event listeners that were added to avoid any memory leaks.
errorCaptured
This hook is only available in version 2.5.0+!
<p v-if="error">{{ error }}</p>
<child-cmp></child-cmp>
export default {
  data() {
    return {
      error: null
    }
  },
  errorCaptured(err, vm, info) {
    console.warn(err, vm, info);
    this.error = 'Oops, something went wrong!';
    return false;
  }
}
errorCaptured is a neat hook that allows us to listen in and react when an error occurs within our component tree. It is unique among the hooks in that it takes in parameters. In the above example, we have labeled those parameters err, vm, and info. They are as follows:
err: Information about the error that occurred.vm: The component instance in which the error occurred.info: Where in the component cycle the error occurred.
You can also optionally return false from this hook. If you return false, you are saying that the error has been handled and will stop further propagation of the error. If you do not return false, the error will propagate up the component tree, hitting any additional errorCaptured hooks, and if progagation is not stopped, it will eventually reach the global config.errorHandler.
In the above example, an error occurs, so we notify the user that something went wrong, additionally logging information about the specific error the console. We then return false, preventing further propagation and considering that error has being handled.
activated and deactivated
The last two lifecycle hooks are only available for use with keep-alive components. If you know what those are, keep reading! If you’d like to learn a bit about keep-alive components, you can check out this post.
activated
<p v-if="showWelcomeBack">Welcome back!</p>
export default {
  data() {
    return {
      showWelcomeBack: false
    }
  },
  activated() {
    this.showWelcomeBack = true;
  }
}
activated will run when a keep-alive component is brought out of a cached state and set as the active component. In the above example, we can set a welcome back message to show when the user goes back to viewing a component that they had been looking at previously. We don’t want the user to see the message the first time the component initializes, but if they switch to a different tab and then back, we may want to acknowledge that.
deactivated
export default {
  data() {
    return {
      previousScroll: {
        x: null,
        y: null
      }
    }
  },
  deactivated() {
    this.previousScroll.x = window.scrollX;
    this.previousScroll.y = window.scrollY;
  }
}
deactivated is the clear opposite to activated, and will run when a keep-alive component is set into a cached state. In the above example, we have a scenario where we might want to keep track of where in the page the user was scrolled to so that we can set the scroll back to that point if the component does get activated later.
Conclusion
The lifecycle hooks are a really powerful tool to be able to respond to the Vue instance at specific points. Knowing how to use those hooks effecively can go a long way to helping write cleaner components. Understanding the lifecycle itself can also help with pinpointing bugs and writing more performant code.